1
2
3
4
5
6
7
8
9
10
11
12
13
14
15
16
17
18
19
20
21
22
23
24
25
26
27
28
29
30
31
32
33
34
35
36
37
38
39
40
41
42
43
44
45
46
47
48
49
50
51
52
53
54
55
56
57
58
59
60
61
62
63
64
65
66
67
68
69
70
71
72
73
74
75
76
77
78
79
80
81
82
83
84
85
86
87
88
89
90
91
92
93
94
95
96
97
98
99
100
101
102
103
104
105
106
107
108
109
110
111
112
113
114
115
116
117
118
119
120
121
122
123
124
125
126
127
128
129
130
131
132
133
134
135
136
137
138
139
140
141
142
143
144
145
146
147
148
149
150
151
152
153
154
155
156
157
158
159
160
161
162
163
164
165
166
167
168
169
170
171
172
173
174
175
176
177
178
179
180
181
182
183
184
185
186
187
188
189
190
191
192
193
194
195
196
197
198
199
200
201
202
203
204
205
206
207
208
209
210
211
212
213
214
215
216
217
218
219
220
221
222
223
224
225
226
227
228
229
230
231
232
233
234
235
236
237
238
239
240
241
242
243
244
245
246
247
248
249
250
251
252
253
254
|
import torch
import torch.nn as nn
import torch.nn.functional as F
from torch import optim, autograd
from matplotlib import pyplot as plt
from mpl_toolkits.axes_grid1 import make_axes_locatable
from Dynamic_drawing import image2gif
''' Solve the following PDE
-\Delta u(x) = 1, x\in \Omega,
u(x) = 0, x\in \partial \Omega
\Omega = (-1,1) * (-1,1) \ [0,1) *{0}
'''
class PowerReLU(nn.Module):
"""
Implements simga(x)^(power)
Applies a power of the rectified linear unit element-wise.
NOTE: inplace may not be working.
Can set inplace for inplace operation if desired.
BUT I don't think it is working now.
INPUT:
x -- size (N,*) tensor where * is any number of additional
dimensions
OUTPUT:
y -- size (N,*)
"""
def __init__(self, inplace=False, power=3):
super(PowerReLU, self).__init__()
self.inplace = inplace
self.power = power
def forward(self, input):
y = F.relu(input, inplace=self.inplace)
return torch.pow(y, self.power)
class Block(nn.Module):
"""
Implementation of the block used in the Deep Ritz
Paper
Parameters:
in_N -- dimension of the input
width -- number of nodes in the interior middle layer
out_N -- dimension of the output
phi -- activation function used
"""
def __init__(self, in_N, width, out_N, phi=PowerReLU()):
super(Block, self).__init__()
self.L1 = nn.Linear(in_N, width)
self.L2 = nn.Linear(width, out_N)
self.phi = nn.Tanh()
def forward(self, x):
return self.phi(self.L2(self.phi(self.L1(x)))) + x
class drrnn(nn.Module):
"""
drrnn -- Deep Ritz Residual Neural Network
Implements a network with the architecture used in the
deep ritz method paper
Parameters:
in_N -- input dimension
out_N -- output dimension
m -- width of layers that form blocks
depth -- number of blocks to be stacked
phi -- the activation function
"""
def __init__(self, in_N, m, out_N, depth=4, phi=PowerReLU()):
super(drrnn, self).__init__()
self.in_N = in_N
self.m = m
self.out_N = out_N
self.depth = depth
self.phi = nn.Tanh()
self.stack = nn.ModuleList()
self.stack.append(nn.Linear(in_N, m))
for i in range(depth):
self.stack.append(Block(m, m, m))
self.stack.append(nn.Linear(m, out_N))
def forward(self, x):
for i in range(len(self.stack)):
x = self.stack[i](x)
return x
def get_interior_points(N=512, d=2):
"""
randomly sample N points from interior of [-1,1]^d
"""
return torch.rand(N, d) * 2 - 1
def get_boundary_points(N=32):
"""
randomly sample N points from boundary
"""
index = torch.rand(N, 1)
index1 = torch.rand(N, 1) * 2 - 1
xb1 = torch.cat((index, torch.zeros_like(index)), dim=1)
xb2 = torch.cat((index1, torch.ones_like(index1)), dim=1)
xb3 = torch.cat((index1, torch.full_like(index1, -1)), dim=1)
xb4 = torch.cat((torch.ones_like(index1), index1), dim=1)
xb5 = torch.cat((torch.full_like(index1, -1), index1), dim=1)
xb = torch.cat((xb1, xb2, xb3, xb4, xb5), dim=0)
return xb
def weights_init(m):
if isinstance(m, (nn.Conv2d, nn.Linear)):
nn.init.xavier_normal_(m.weight)
nn.init.constant_(m.bias, 0.0)
epochs = 50000
in_N = 2
m = 10
out_N = 1
device = torch.device('cpu' if torch.cuda.is_available() else 'cpu')
model = drrnn(in_N, m, out_N).to(device)
model.apply(weights_init)
optimizer = optim.Adam(model.parameters(), lr=3e-3)
print('神经网络结构:')
print(model)
best_loss, best_epoch = 1000, 0
Loss_list = []
print('开始学习:')
for epoch in range(epochs + 1):
xr = get_interior_points()
xb = get_boundary_points()
xr = xr.to(device)
xb = xb.to(device)
xr.requires_grad_()
output_r = model(xr)
output_b = model(xb)
grads = autograd.grad(outputs=output_r, inputs=xr,
grad_outputs=torch.ones_like(output_r),
create_graph=True, retain_graph=True, only_inputs=True)[0]
loss_r = 0.5 * torch.sum(torch.pow(grads, 2), dim=1) - output_r
loss_r = torch.mean(loss_r)
loss_b = torch.mean(torch.pow(output_b, 2))
loss = loss_r + 500 * loss_b
Loss_list.append(loss / (len(xr) + len(xb)))
optimizer.zero_grad()
loss.backward()
optimizer.step()
torch.save(model.state_dict(), 'new_best_Deep_Ritz.mdl')
if epoch % 100 == 0:
print('epoch:', epoch, 'loss:', loss.item(), 'loss_r:', (loss_r).item(), 'loss_b:',
(500 * loss_b).item())
if epoch > int(4 * epochs / 5):
if torch.abs(loss) < best_loss:
best_loss = torch.abs(loss).item()
best_epoch = epoch
torch.save(model.state_dict(), 'new_best_Deep_Ritz.mdl')
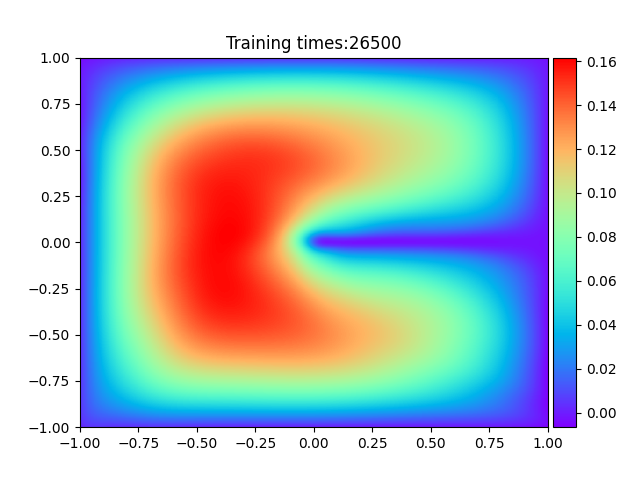
if epoch % 500 == 0:
plt.ion()
plt.close('all')
model.load_state_dict(torch.load('new_best_Deep_Ritz.mdl'))
with torch.no_grad():
x1 = torch.linspace(-1, 1, 1001)
x2 = torch.linspace(-1, 1, 1001)
X, Y = torch.meshgrid(x1, x2)
Z = torch.cat((Y.flatten()[:, None], Y.T.flatten()[:, None]), dim=1)
Z = Z.to(device)
pred = model(Z)
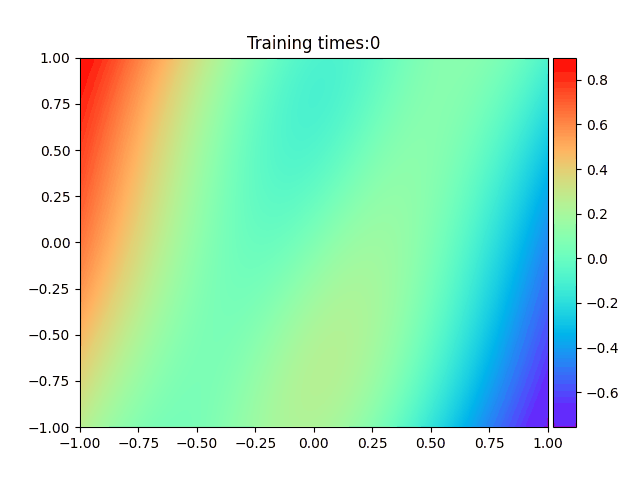
plt.figure()
pred = pred.cpu().numpy()
pred = pred.reshape(1001, 1001)
ax = plt.subplot(1, 1, 1)
h = plt.imshow(pred, interpolation='nearest', cmap='rainbow',
extent=[-1, 1, -1, 1],
origin='lower', aspect='auto')
plt.title("Training times:" + str(epoch))
divider = make_axes_locatable(ax)
cax = divider.append_axes("right", size="5%", pad=0.05)
plt.colorbar(h, cax=cax)
plt.savefig('./Training_process/Deep_Ritz_' + str(epoch) + '.png')
if epoch == best_epoch:
plt.savefig('Best_Deep_Ritz.png')
print('=' * 55)
print('学习结束'.center(55))
print('-' * 55)
print('最优学习批次:', best_epoch, '最优误差:', best_loss)
plt.close('all')
plt.ioff()
plt.title('Error curve')
plt.xlabel('loss vs. epoches')
plt.ylabel('loss')
plt.plot(range(0, epochs + 1), Loss_list, label='Loss')
plt.savefig('Error_curve_Deep_Ritz.png')
print('已生成"最优拟合结果图",请打开文件"Best_Deep_Ritz.png"查看')
print('已生成"误差曲线图",请打开文件"Error_curve_Deep_Ritz.png"查看')
print('-' * 55)
print('准备绘制训练过程动态图')
image2gif.image2gif('Deep_Ritz')
print('=' * 55)
|
 > 学习过程 >
 > 学习过程 >
 > 学习过程 >
 > 学习过程 >